Just as planned at the end of The Small Calendar – jQuery + PHP in practise, I’ve decided to create a system (Windows) gadget containing The Small Calendar . In this entry I will try to explain the secrets of creating such gadgets. Gadgets appeared with Vista – as a part of sidebar, in Windows 7 they already are autonomous pice of software, which can be scattered anywhere on the desktop.
First steps
The Windows gadgets platform is a kind of framework for creating and hosting mini-applications. 1 Application development is almost the same as regular web pages. Technologies to use: (x)HTML, CSS, JavaScript, JScript, VBscript. Of course it’s possible to attach external libraries, in this example I will show how easy it is to use the jQuery library.
Product storage
Gadgets are stored in a specific directory. Starting with creating a new gadget the best way is to create a directory yourself (later, after the completion of the work, the gadget will create it itself during install). Gadgets store folder in Windows 7: %localappdata%\Microsoft\Windows Sidebar\Gadgets\. So, for Vokiel user, it will be for example: C:\Users\Vokiel\AppData\Local\Microsoft\Windows Sidebar\Gadgets\. In this directory, create a folder for a particular gadget, a name should end with .gadget extension. In our case it will be: TheSmallCalendar.gadget.
Manifest
The gadget.xml file describes the contents of the package, gadget. It contains basic information about the additive, which later can be seen on the gadgets screen.
Created calendar contains includes the following description:
1 2 3 4 5 6 7 8 9 10 11 12 13 14 15 16 17 18 19 20 21 22 23 | <?xml version="1.0" encoding="utf-8" ?> <gadget> <name>The Small Calendar</name> <namespace>vokiel.widgets</namespace> <version>1.0.2</version> <author name="Vokiel"> <info url="http://blog.vokiel.com/the-small-calendar-jquery-php-w-praktyce" /> <logo src="img/icon.png" /> </author> <copyright>© Vokiel | vokiel.com</copyright> <description>To jest mały kalendarz, który pozwala sprawdzić dzień tygodnia dla wybranej daty. Ten kalendarz jest inny niż wszystkie, posiada tylko jeden blok dni!</description> <icons> <icon height="48" width="48" src="img/TheSmallCalendar_48x48.png" /> </icons> <hosts> <host name="sidebar"> <base type="HTML" apiVersion="1.0.0" src="TheSmallCalendar.html" /> <permissions>Full</permissions> <platform minPlatformVersion="1.0" /> <defaultImage src="img/TheSmallCalendar_48x48.png" /> </host> </hosts> </gadget> |
Detailing the contents of this file is not necessary, XML tags are so good selected, so they itself are a sufficient description. The most important thing in this file is to identify the main gadget file, in this case:TheSmallCalendar.html, this file will be open after the application starts.
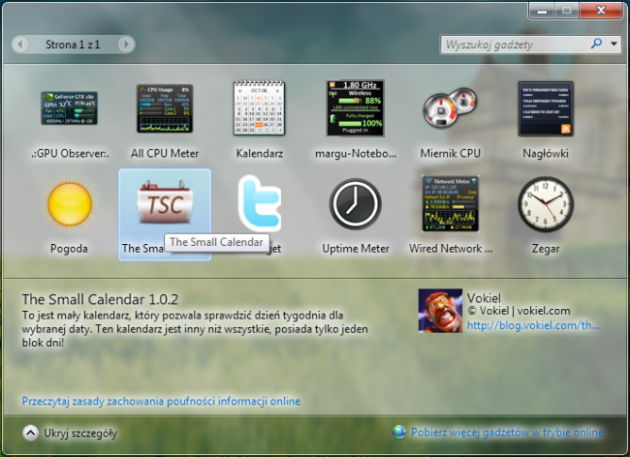
Result of the description contained in the above code listing is as follows:
An accurate description of fields and it’s relation elements shows the screen-shoot coming from the source – Microsoft 2
Files structure
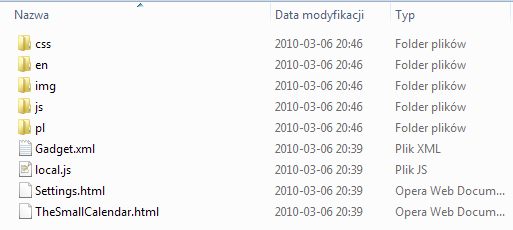
To preserve the order let’s create the following file structure:
In the css folder we will keep the external style sheets (for the main page and the gadget settings page). Next, in the img folder we will keep graphic elements, and the folder js – as it is not difficult to guess: the files containing JavaScript – the most important in our application. Catalogs from the names of the languages will be used to store the translations.
Languages
As mentioned above, it is possible to create folders for translations into other languages. Through brilliant use of translations on the side of the system, the thing is very simple. The system searches for files by searching in the directories according to the established order. Starting with the full name of the location, eg: en-us, pl_pl, then if it is not found, moves to the search for the abbreviated name of the directory, eg: en, pl, and if that fails, searches the root gadget directory. Seeking language version is obviously the one that has been set in the system. So, if you run a computer with a English language version of Windows, the system running the gadgets will explore the language files in the following order: en_US -> en -> root directory.
An important thing to tick is possibility to create different language versions of the files that describeing the gadget.
The practical use of translations is trivial. We create variables in JavaScript, to which we assign tranlations values, appropriate for chosen language, then these translations are saved into appropriate directories. Next in the code explicitly we use it, without having to include the appropriate file with the translation – this will be done by the Windows system.
Filepl\local.js
var lng = {}; lng.legend_year = 'Ustawienia daty'; lng.label_year = 'Rok'; |
Plik en\local.js
var lng = {}; lng.legend_year = 'Date settings'; lng.label_year = 'Year'; |
Using this further is reduced to evoke variables:
$('#legend_year').html(lng.legend_year); |
System.Gadget
Gadgets would have little relevance if they wouldn’t be able to save the settings. The possibility of adapting them to the user opens up many possibilities, in combination with AJAX – an almost endless. There are gadgets which give the ability to view Twitter statuses, to add new entries, tracking the weather in a city, etc. All this because of the possibility to save user preferences.
This task is carried out by using two (four) most important methods.
They are: System.Gadget.Settings.writeString("VariableName", "Value");
and System.Gadget.Settings.readString("VariableName"); and their counterparts trying to guess the data type, ie: .read() and .write(). With these methods we are able to save the settings, which can be read on after your computer is rebooted.
Ofcourse System.Gadget it’s not only a settings. The System.Gadget object it’s more complicated 3 . We will be using just a few main methods, it would be:
- System.Gadget.settingsUI – enabling settings functionality, pointing the settings file
- System.Gadget.onShowSettings – pointing function started after clicking options button
- System.Gadget.onSettingsClosing – pointing function started while the options are closing
- System.Gadget.onSettingsClosed – pointing function started after the options are closed
- System.Gadget.version – getting the version number of the gadget
Starting with JavaScript
Using the methods from the System.Gadget object let’s create an overview of the gadget, the system data flow and action. The main file of the gadget js\TheSmallCalendar.js
1 2 3 4 5 6 7 8 9 10 11 12 | /** * włączenie funkcjonalności ustawień, wskazanie pliku ustawień */ System.Gadget.settingsUI = "Settings.html"; /** * wskazanie funcji uruchamianej po zamknięciu opcji ustawień */ System.Gadget.onSettingsClosed = SettingsClosed; /** * wskazanie funkcji uruchamianej po kliknięciu opcji ustawień */ System.Gadget.onShowSettings = SettingsShow; |
Next, delegation for function in the js\settings.js file
1 2 3 4 | /** * wskazanie funkcji uruchamianej przy zamykaniu opcji ustawień */ System.Gadget.onSettingsClosing = SettingsClosing; |
Having an outline of the functions delegations we can move to the main part – creating The Small Calendar gadget
The Small Calendar
The Small Calendar Gadget will contain two html files (main + settings file), for each of the pages will create external CSS and js file.
HTML files
First file, main in this gadget will be very easy, practically almost empty, all because the content would be dynamicly generated by the JavaScript. Let’s create basic html page structure, including external css file and JavaScript files. As can be seen on code listing below, we have only one main element: div with id. Into this element we will inner our calendar. There are 4 external js files attached, those are: jQuery library, default settings file, language file (Windows will search the folders itself for the translation), the last file it is our main file, core of the application.
1 2 3 4 5 6 7 8 9 10 11 12 13 14 | <html xmlns="http://www.w3.org/1999/xhtml"> <head> <meta http-equiv="MSThemeCompatible" content="yes" /> <meta http-equiv="Content-Type" content="text/html; charset=utf-8" /> <link href="css/TheSmallCalendar.css" rel="stylesheet" type="text/css" /> </head> <body onload="Init();"> <div id="vokiel_small_calendar"></div> <script src="js/jquery-1.4.2.min.js" type="text/javascript" language="javascript" charset="utf-8"></script> <script src="js/defaults.js" type="text/javascript" language="javascript" charset="utf-8"></script> <script src="local.js" type="text/javascript" language="javascript" charset="utf-8"></script> <script src="js/TheSmallCalendar.js" type="text/javascript" language="javascript" charset="utf-8"></script> </body> </html> |
The CSS styles are known from poprzedniego wpisu, they were only slightly adjusted to gadget. An important information is need to define the size of the document. Otherwise, our gadget will not be visible.
body{ width: 284px; height: 295px; font-size: 10px; border: 1px solid #F0F0F0; } |
Settings
The settings subject is also very easy. It is based on creating page with a form where you can define your options. When you click the settings button, a function attached to the body onload is called (in our case it is InitSettings()). This function reads saved variables values System.Gadget.Settings.readString() (if they were not set – it gets the default values), next puts it into the form fields. In this gadget, in case of clarity, I’ve defined the function just in the html code. The better way would be to delegate it using events.
document.onreadystatechange = function(){ if(document.readyState=="complete"){ // kod } } |
After the settings are changed and commited, there are function delegated for System.Gadget.onSettingsClosing invoked, in wchich settings are read from the form fields, checked, and after all saved in system System.Gadget.Settings.writeString().
1 2 3 4 5 6 7 8 9 10 11 12 13 14 15 16 17 18 19 20 21 22 23 24 25 26 27 28 29 30 31 32 33 34 35 36 37 | <html xmlns="http://www.w3.org/1999/xhtml"> <head> <meta http-equiv="MSThemeCompatible" content="yes" /> <meta http-equiv="Content-Type" content="text/html; charset=utf-8" /> <link href="css/settings.css" rel="stylesheet" type="text/css" /> </head> <body onload="InitSettings();"> <fieldset> <legend id="legend_year"></legend> <label for="year" id="label_year"></label> <div> <input type="text" name="year" id="year" maxlength="4" accept="0123456789" value=""/> </div> </fieldset> <fieldset id="fieldset_colors"> <legend id="legend_color"></legend> <label for="color_31" id="label_color_31"></label> <div> <span>#</span><input type="text" name="color_31" id="color_31" maxlength="6" accept="0123456789ABCDEF" value=""/> </div> <label for="color_30" id="label_color_30"></label> <div> <span>#</span><input type="text" name="color_30" id="color_30" maxlength="6" accept="0123456789ABCDEF" value=""/> </div> <label for="color_2829" id="label_color_2829"></label> <div> <span>#</span><input type="text" name="color_2829" id="color_2829" maxlength="6" accept="0123456789ABCDEF" value=""/> </div> </fieldset> <small id="author_url"></small><small id="ver"></small> <script src="js/jquery-1.4.2.min.js" type="text/javascript" language="javascript" charset="utf-8"></script> <script src="js/defaults.js" type="text/javascript" language="javascript" charset="utf-8"></script> <script src="local.js" type="text/javascript" language="javascript"></script> <script src="js/settings.js" type="text/javascript" language="javascript"></script> </body> </html> |
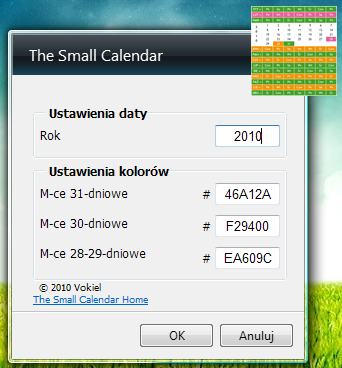
As You can see on the listing above, the settings page contains 4 editable fields. These are: year, background colors for months grouped with days count of the months (31,30,28 and / or 29). Of course, a further extending is most appropriate. The plan I have is to add the color for the text, because now if you change the background to a light shade the whole gadget becomes unreadable. However, for this example, the introduction to the topic we do not need more options.
The option panel looks like this:
Action schema
Move to the merits of creating a gadget – a combination of acquired knowledge into a single working thing. Perhaps part of the previous entry seems to be detached from each other, I hope that after this part and the end part everything will become clear.
Action schema of the gadget is quite intuitive.
- Gadget installation, system using the data from
gadget.xmlfile shows informations about the addon. - In the
basemarker, located inhosts->hostbranch there is information of wich file should be regarded as the main gadget file. - When you run the gadget, the js files are included, in which there is default configuration located, the saved translation language, and functions for generating the content of the add-on.
- The function
Init();located injs/TheSmallCalendar.jsfile is invoked, this function reads saved configurations (if empty uses defaults), generates calendar, puts it into gadget, colorize calendar acording the colors settings. - In the case of clicking the option icon, system opens file defined by assigning
System.Gadget.settingsUI = "Settings.html"; - After teh page is loaded the
InitSettings()function is invoked, this function fills labels with appropriate translationsLoadLang()and puts saved/defaults settings into form fieldsLoadSettings() - After committing the settings the function
SettingsClosing()is invoke, this function reads the data written in form fields and saves it into configuration. Thus after a reboot of the system settings are stored (in the case of turning off the gadget and re-open it – settings are resetted) - After the settings panel is cosed and the changes are saved the function
SettingsClosed()from js file assigned in main page is invoked. So the control is transferred back to the
TheSmallCalendar.htmlpage, invoked function was delegated by
System.Gadget.onSettingsClosed = SettingsClosed; - Function
SettingsClosed()reloads the calendar as if it was first time launched. In the case of other gadgets it could be enought to just reload a part of it, unfortunately in this case its necessary to make the calendar over (year change).
Creating the package – .gadget
The last stage ist to create final package, one file, gadget installer. At this point, Microsoft developers need to be appreciated. Makeing that kind of package comes into zipping the folder, and changeing extension into gadget. Of course, there is another way: You can make CAB package with ability to be digital signed 4 .
Completion
Built gadget, like his on-line version, retained functionality of selecting the year, changing language, responding to the outbreak of the mouse cursor over the selected parts.
Functionalities not disappeared. There was some improvement. Using the gadget does not require an open browser window is useful, faster. Language selection is automated, so you need no extra clicks. Once configured gadget can be used for a long time.
Project site
I invite You to a special web page for this project : http://blog.vokiel.com/thesmallcalendar/
Źródła
- http://msdn.microsoft.com/en-us/library/dd370869(VS.85).aspx [↩]
- http://msdn.microsoft.com/en-us/library/bb508509(VS.85).aspx#_sidebar_manifest_02_gadget_element [↩]
- http://msdn.microsoft.com/en-us/library/bb508511(VS.85).aspx [↩]
- http://msdn.microsoft.com/en-us/magazine/cc163370.aspx#S12 [↩]


.png)
 Robert "Vokiel" - web developer.



Dear, i’ve tried to install it from here
http://blog.vokiel.com/thesmallcalendar?lang=en
but it didn’t runs!! :S
Anyway, you are doing a very good work… We could try to sell it to microsoft, no?? Or to iPhone?
My idea, your development… our partnership!! 😀
what do you think about??
Yes, I’ve noticed, that it’s not installing itself. Try to copy everything from the archiv into the
C:\Users\YourAccountName\AppData\Local\Microsoft\Windows Sidebar\Gadgets\TheSmallCalendar.gadget\We should, if they would like to pay for it 🙂
swietny artykul, dzieki, przymierzam sie do pyknięcia gadżetu i ten art bardzo mi pomoże.
Wiesz co byłoby jeszcze super? Ten sam art ale w wersji jak to zrobić przy użyciu Script# , wzmianka o takiej mozliwosci http://www.nikhilk.net/SidebarGadgets.aspx
Super 😀